
The Custom Colorblock Scarf

The Custom Colorblock Scarf is a Tunisian crochet pattern that uses colorwork and two strands of yarn held together at a time. It’s a great stash-busting project, but it can also be used to create a totally custom-to-you scarf that you’ll reach for every time you leave the house.
When I was in high school, I spent almost all my free time baking. But the joke in my family was that if it you liked the taste of one of my bakes, you needed to savor it because I wasn’t going to make that recipe ever again. In my amateur baking career, I made a single brownie cheesecake, just one chocolate pecan pie, a lonesome batch of lemon bars… the list could go on forever. To this day, the only baking recipe I will repeat is for Nutella banana bread muffins (and that’s only if you ask nicely).
Whether I’m baking or crocheting, I live for the process of trying something new. I love picking up new instructions and being surprised by the outcome. Once I realize that outcome, the excitement trails off, and I’m not as interested in repeating the process. This is the same reason it’s hard for me to finish dresses and sleeves, and it’s why I’m scared to ever start a knitting a pair of socks.
Something about the pattern for The Custom Colorblock Scarf is different. I’ve already made two and half scarves using this technique, but at the same time it’s totally in line with my “never-repeat” habits. The colorwork technique yields infinite patterns, making each scarf feel like it is being made for the first time.
I also built in some “tricks” that appeal to my lazy sensibilities when the process starts to get repetitive and boring. Since gauge is not super critical here, you can just use your first color block as a swatch to get a sense of your measurements. From there, each color block is joined-as-you-go, and I’ve also included instructions to securely weave in your ends along the way. The remaining ends of yarn at the beginning and end of the project are used in the fringe. Don’t worry - I’ve thought of everything!
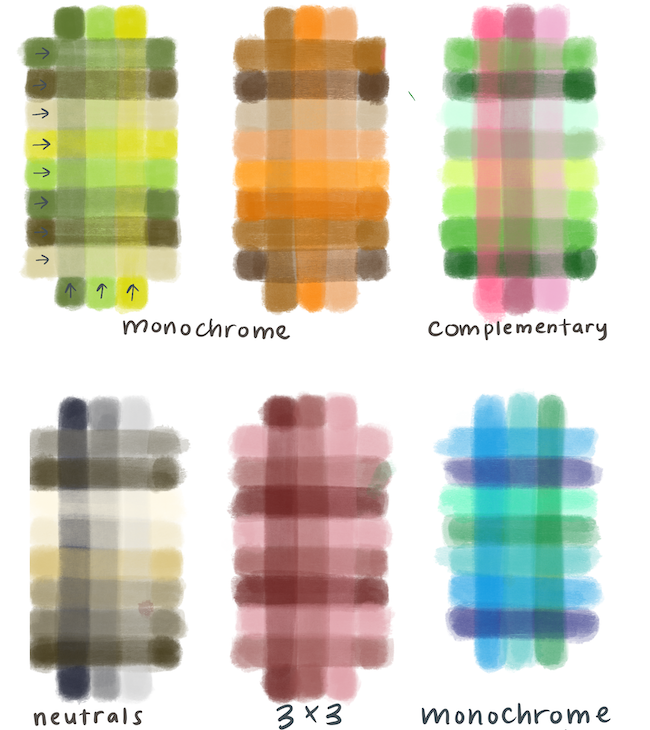
For your colorwork, you can go all out with a bright rainbow palette or opt for a muted color palette using shades of just 1-2 colors.. It was so fun to see the different palettes that each of my testers chose from pastel and earthy tones, to using variegated yarns that added another layer of dimension to the colorwork. I myself followed both paths: I made a rainbow version inspired by the color selector in different graphic design apps, and I made a more muted one using my boyfriend’s two favorite colors.
I hope you’ll find this project as enjoyable as I have. Please tag me on socials @jacqofyarns so that I can see what color schemes you choose. It has been so fun to see the pattern come to life!


Many thanks to my pattern testers Christie, Rachel (@thecrochetist), Az (@mothingmagnolias), and Rhiannon (@lavendercoloredkook) for their super helpful feedback in getting this pattern up! Their color choices were so amazing!
Pattern for The Custom Colorblock Scarf
Buy a downloadable PDF version of this pattern here.
Use this pattern to play with bright colorwork or bust your growing yarn stash. Whether you want to create a tonal color scheme or go for a more random look; this scarf is versatile enough to fit into any wardrobe. It is worked mainly in tunisian simple stitch and joins as you go, so there are minimal ends to weave in. It's the perfect balance of creativity and mindlessness!
The yarns listed are what I used to make my samples, but you can use anything you like. Just make sure that the vertical colors (VERTX) are all of the same weight, To get more even color blocks, the horizontal colors (HORX) should also be all of the same weight, but this is not as important.
Level: Beginner
-
11sts x 10 rows = 2.75” (7cm)
Worked over 1 foundation row, 1 row TPS, 8 rows TSS (unblocked)
Notes on Gauge:
Gauge is not super important to this pattern, so I made the gauge based on the first square that you will make for the scarf (see directions). If you get a square that is roughly 2.75 square inches, you can simply proceed with creating the rest of the scarf!
If you plan to use a different weight yarn or different # of colors, please feel free to adjust accordingly. (e.g. if you use a lighter weight yarn, use a larger hook, or add more stitches to the foundation row; if you have more horizontal colors, you will end up with a longer scarf, or you can repeat the color pattern less times). This pattern is infinitely adaptable!
-
Based on Materials Listed, using 4 horizontal colors, repeated 7 times
Width: 8.25" (21cm) x Length: ~77" (195cm)
-
Yarn:
For the vertical stripes: any fingering weight yarn (approx 200-230 yds; 183-210m) x 3 colors (labeled VERTA, VERTB, VERTC)
For the horizontal stripes: any fingering weight yarn (approx 100 yds; 91m) x however many colors you’d like to use (labeled HORA, HORB, HORC, etc.)
6mm Tunisian Crochet hook (you may also use a regular crochet hook if the neck is straight and doesn’t have a thumb rest)
Scissors
-
retp - return pass
yo - yarn over
tss - Tunisian simple stitch
tps - Tunisian purl stitch

Instructions:
This pattern is worked in 3 vertical strips. After the first vertical strip is finished, the next two strips are added in a "join-as-you-go" format. The ends can also be woven in as you go, minimizing the number of finishing steps needed (instructions below).
The first square can be used as your gauge swatch, though gauge is not super critical to this pattern. You can adjust the foundation chain and # of rows to achieve the length and width that you prefer.
Stitch counts include all loops that are on your hook at the end of the forward pass.
Colorwork Setup & Planning:
The colorwork for this scarf is created by holding two strands of yarn together at once: a vertical color (VERTA, etc.) and a horizontal color (HORA, HORB, etc.) For each strip, you will keep the vertical square color the same throughout and change the horizontal colors after each square is complete.
The horizontal colors should be changed in the same order for each vertical strip to create the desired colorblock pattern. You can plan to have anywhere between 24-36 horizontal stripes, meaning that you can use any number of horizontal colors. This pattern is written with 4 horizontal colors, repeated 7 times, but feel free to expand or minimize to match the yarn and color scheme that you have in mind.
If you’d like an idea of how the colors will look together, you can use an app like Procreate to simulate the final product. Set the transparency of your pen to ~55% and layer the colors in a crosshatch pattern as seen in the photo.
Strip #1 - Crocheting Your First Square (and Gauge Swatch)
Using VERTA and HORA, make a slip knot with a yarn tail that is ~6 in. (15cm) long. Chain 11. Do not crochet over the yarn tail as we will use this in the twisted fringe.
Note: This is the number of stitches you will have for each strip and 1/3 the width of the final scarf.
Create your foundation row -
*Insert your hook in the back bump of the second chain from your hook, yo and draw up a loop*. Repeat ** for each of the following back bumps in your foundation chain. (11 stitches),
Return(retp) - ch 1, *yo and pull through 2 loops*. Repeat ** until there is only one loop remaining on your hook.
Row 2 - Tunisian Purl Stitch (tps)
Forward - *Bring the working yarn in front of your hook, insert your hook into the second vertical bar of the previous row, return the working yarn to the back of your hook, yo and draw up a loop*. Repeat ** 9 times, inserting your hook in the 2 vertical bars on the edge of your work for the last stitch. (11 total loops on your hook)
retp as in row 1
Row 3 - Tunisian Simple Stitch (tss)
Forward - *Insert your hook in the second vertical bar of the previous row and draw up a loop.* Repeat ** 9 times, inserting your hook in the 2 vertical bars on the edge of your work for the last stitch. (11 total loops on your hook)
retp as in row 1
Repeat row 3 (6) more times until your square is made up of 9 total rows.
Row 10 - Color Change Row
Forward - repeat row 3 on the forward pass
retp - change colors for ch 1 by drawing up a loop with colors VERTA and HORB, cut HORA and tie a knot with HORB, retp, weaving in ends as you go

Weaving in ends as you go:
Alternate holding the ends of your yarn in front of and behind the working yarn on the return pass. This will hold the ends in place. On the next forward pass, after inserting your hook in the vertical bar, insert your hook under the exposed ends (on every other stitch) to further secure the ends.
At this point, you can measure your first square to see if you meet gauge. The first square should measure 2.75"x2.75" (7cm x 7cm) unblocked.
Strip 1: Squares 2-28 (Changing Colors and Weaving Ends as You Go)
Continue making strip 1 by repeating rows 11-20 below for as many horizontal colors you’d like to use.
Rows 11-19
Forward - tss in the vertical bars (11 stitches), finish weaving in ends as mentioned in the above note
retp as in row 1
Row 20 - Color Change Row
Forward - tss in the vertical bars (11 stitches)
retp as in row 10, changing HORB to HORC as in row 10 above
Repeat rows 11 through 20 (26) more times for a total of (28) color blocks, or until your first vertical strip is as long as you want the scarf to be. On your last square of this vertical strip, replace the Color Change Row with the TSS Bind Off below.
TSS Bind Off
Insert hook into the vertical bar and draw up a loop, yo and pull through both loops on hook. Repeat 9 more times across the row. Cut your working yarns to your desired fringe length and tie off (recommend the length of two squares, do not sew in this end)
Strips 2 & 3: Square 1
Row counts start over from this point on.
Create a slip knot using colors VERTB and HORA, leaving a yarn tail that is ~2 square lengths long. Join your working yarn to the first vertical strip by pulling the slip knot through the 11th chain in the foundation row. Chain 11. Do not crochet over the yarn tail as we will use this in the twisted fringe.

Create your foundation row -
*Insert your hook in the back bump of the second chain from your hook, yo and draw up a loop*. Repeat ** for each of the following back bumps in your foundation chain. (11 stitches),
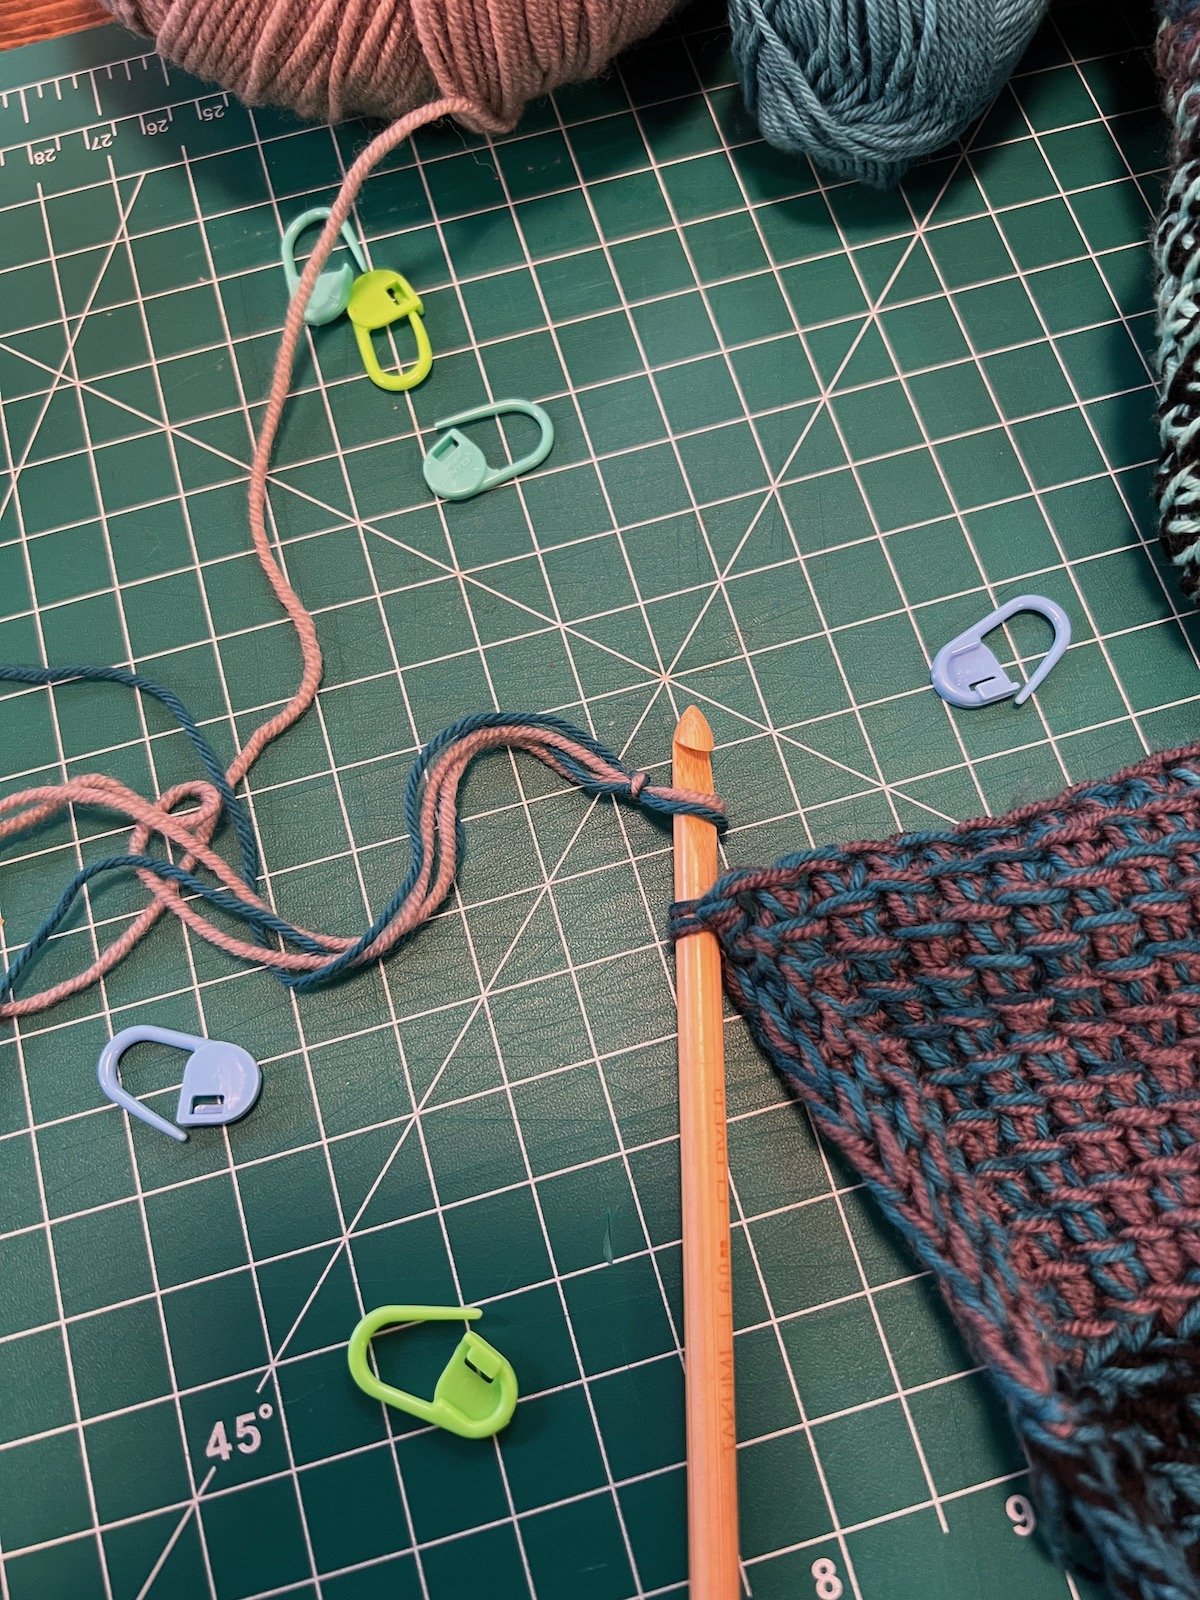
Return(retp) - Join As You Go Ch 1 (jayg ch 1-insert your hook into the first loop of the first row on vertical strip #1 PLUS its corresponding back bump (see photo), yo and draw up a loop) *yo and pull through 2 loops*. Repeat ** until there is only one loop remaining on your hook.
Row 2 - Tunisian Purl Stitch (tps)
Forward - tps (11 stitches)
retp as in row 1 (using the jayg ch 1)
Row 3 - Tunisian Simple Stitch
Forward - tss in the vertical bars (11 stitches)
retp as in row 1 (using the jayg ch 1)
Repeat row 3 (6) more times until your square is made up of 9 total rows.
Row 10 - Color Change Row
Forward - tss in the vertical bars (11 stitches)
retp - Using the jayg ch 1, cut HORA and draw up a loop with HORB and VERTB, retp
Strips 2 & 3: Squares 2-28
Continue making strips 2 & 3 by repeating rows 11-20 below for as many horizontal colors you’d like to use.
Rows 11-19
Forward - tss in the vertical bars (11 stitches), finish weaving in ends as mentioned in the above note
retp as in row 1 (using the jayg ch 1)
Row 20
Forward - tss in the vertical bars (11 stitches)
retp as in row 10, changing HORB to HORC as in row 10 above (using the jayg ch 1)
Repeat rows 11 through 20 (26) more times for a total of (28) color blocks, or until your vertical strip is as long as your first vertical strip. On your last square of each vertical strip, replace the Color Change Row with the JAYG TSS Bind Off below.
Repeat the steps for squares 1-28 for Strip #3 and any additional vertical strips you'd like to include on this scarf.
Twisted Fringe
Create fringe by measuring 40 equal strands of yarn (2 strands per bind off stitch) for each of your vertical colors. The recommended length of each strand is roughly 4 square lengths, but feel free to make this shorter or longer than your preference. Just keep in mind that the fringe will be half the length of each strand, then get ~40% shorter after you twist it. (120 strands total)
An easy way to get even strands of yarn is to use a book that is about as wide as you want your fringe strands to be long (i.e. 2 square lengths wide). Wrap your yarn around the book 40 times, then carefully cut along the page side of the book.
Using two strands of yarn at a time, fold your fringe in half. Using your tunisian crochet hook or a regular crochet hook of corresponding size, insert your hook into the two bars on the edge of the scarf on the strip that matches the color of your yarn. (This is the two bars of your foundation row chains, or the top two bars of the bind off stitches, similar to traditional crochet.) Draw up the loop made by folding your fringe in half, then pull the 4 loose ends through your loop. Pull the ends to tighten.
Repeat this until you have 10 fringe bundles for each vertical color on each end of the scarf. For a neater look, make sure that you pull up your loop in the same direction each time (i.e. front to back).
Starting with one end of the scarf, at the edge that has the yarn tail from Strip # 1, hold the two strands of this yarn tail in one hand, and hold 2 strands from your first fringe bundle in the other. Twist these 2 pairs over each other 20-40 times (more for a tighter twist/shorter fringe). Tie a knot with all 4 strands of yarn.
Repeat step 3 using the remaining two strands from your first fringe bundle, plus two strands from the next fringe bundle. Repeat this process across the end of your scarf. When you get to another yarn tail, divide the two strands of this yarn tail between your two pairs, matching the vertical color with the strands of the same color, and the horizontal color with the other 2 strands. Twist 3 strands on each side. Your last twisted fringe will also be 3x3 strands.
For a neater look, make sure the same sided strand is twisted on top each time. (i.e. right over left), and twist each fringe the same number of times. Repeat steps 2-4 for the other end of the scarf.


Finishing Your Work
Block and dry your finished work. Cut off any excess yarn from the ends that you wove in earlier, and weave in any stray ends. Trim the fringe ends so that they are roughly the same length. Enjoy your new scarf!
If you made it this far, thank you for reading, and I hope you enjoyed making this pattern! If you feel so inclined, you can buy me a cup of coffee here.
This pattern is the property of JacqofYarns. Do not modify, resell or share this pattern. If you sell finished items made from this pattern please credit JacqofYarns as the pattern designer in the product listing.